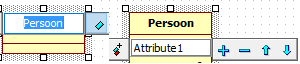
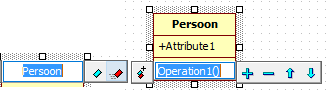
Cursussen/Courses Codesnippets     Top 
UML class diagram - Create class


1. Create class
In the “Class” list of the toolbox you will find a “Class” button. If you click this button (or double click) you can place a class frame on the drawing board by clicking on the drawing board. A text box for the class name and a button on the left to indicate visibility will appear. With the buttons on the right you can add an attribute or add an operation, respectively.


2. Class name
Change the suggested name to create a class framework. If you click outside it (or press Enter) the name will be accepted. If you double click on the name you can change it. If you click on the frame once, you can move the frame.


3. Visibility
If you click on the left button, you can indicate the visibility. An abstract class is usually “Protected” and the other classes are usually “Public” (which is also the default value).


4. Attributes
If you click on the light blue (first button) on the right, an input box will be shown to enter an attribute. After you have entered the correct name, you can click on the blue plus sign to add the next attribute. Clicking the minus sign removes the attribute. With the arrows you can move attributes up or down.


5. Operations
With the red button next to the class name you can add an operation. You can enter the correct name of the operation. The buttons on the right work like the attributes. If you want to enter parameters for the operation, you have to proceed differently. See further.


6. Other actions
If you right click on the class frame you can perform other actions. You can add attributes and operations via the menu entry “Add”.


7. Example
An example of an abstract class “Persoon”. The attributes are “Protected” and therefore only accessible in the operations (methods) of the abstract class and all derived classes. Other objects must use the "set" or "get" operations to use the information in the attributes.