Cursussen/Courses Codesnippets     Top 
MySQL workbench - EER diagram table


1. New EER diagram
Double click on the “Add Diagram” icon in the “Model Overview” window to create a new EER diagram.


2. EER diagram toolbar
In the diagram window you can use the toolbar to perform operations in the diagram. If you click on the button “Place a new table” or if you press the “T” key, you can add a new entity (or table).


3. Place a table
Click on the canvas and an entity (table) box will appear. Double click on the entity to bring up the “Table” tab below it.


4. Table name
In this window you give the entity (table) the correct name and enter the attributes (fields). With the button at the top right you can further complete the details of the entity.


5. Table info
Click the button at the top right to return to the fields table view.


6. Table field name
In the fields table you can double click in the cells of the column “Column Name”. The names of the fields usually consist of lowercase letters and it is best that there are no spaces. You can use the underscore to join words. The first field is usually the key field (primary key).


7. Table data type
In the list of data types you can choose the appropriate type. The key field is an “INT” and in the checkboxes you can also indicate “PK” (primary key), “NN” (not null) and “AI” (auto increment).


8. Table fields info
You can further complete the other fields (attributes). The data type “varchar()” is used for variable length strings. You can specify the length between the brackets. The data type “decimal()” is used for decimal numbers (such as currency). Between the brackets you put the length and the number of decimal places (10.2 = 10 digits with 2 decimal places). The data type “datetime” is used for date and time indications.


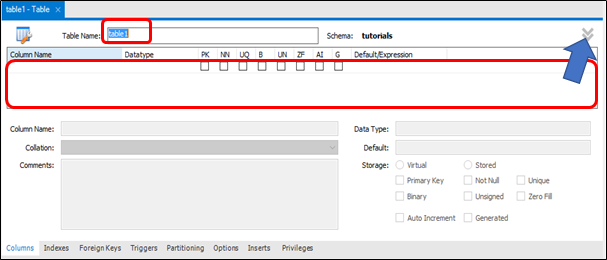
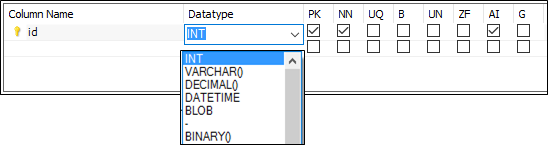
9. Table data type enum
The data type “ENUM()” is used to indicate a picklist with fixed values (e.g. gender ENUM('M','V') means that only the values 'M' (for male) or 'V' (for male) woman) can be entered). The data type “BOOLEAN” is converted to a TINYINT.


10. Diagram window
The “Diagram” window is continuously synchronized with the entries in the “Table” tab. You can close the tab by clicking the x button.


11. Table field info
At the bottom of the tab “Table” you can enter additional field (attribute) information and you can reach the foreign key settings (“ForeignKeys” tab).