4. Images on the board
Now let's show the chess piece images in the panels from the main board panel.
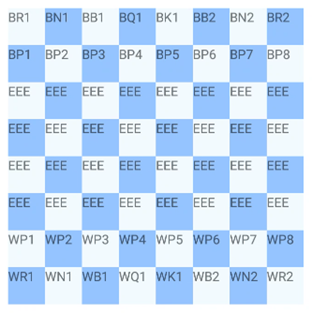
We start with the background color from the squares. The bottom left square has a dark background.
You could also check if the queen is on its color: the white queen starts on a light background.
In the set_panel subroutine add the following line below the line to set the tag:
pnl.Color = get_color(prow,pcol)
And the get_color subroutine looks like this:
Public Sub get_color(crow As Int, ccol As Int) As Int
	Private clr As Int
	If ccol Mod 2 = 0 Then
		If crow Mod 2 > 0 Then
			clr = Colors.ARGB(255,148,195,255)	'black
		Else
			clr = Colors.ARGB(255,241,250,255)	'white
		End If
	Else
		If crow Mod 2 > 0 Then
			clr = Colors.ARGB(255,241,250,255)
		Else
			clr = Colors.ARGB(255,148,195,255)
		End If
	End If
	Return clr
End Sub
And this is what it looks like:
The next step is to replace the text labels with chess piece images. We will hide the labels because we need them in the rest of the programming code. Add a line below the lbl.initialize line:
lbl.Visible = False
With the subroutine fill_imagemap the imagemap will be filled with the image of every chess piece.
Here's the code:
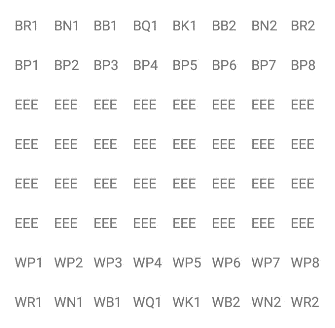
Private Sub fill_imagemap
	For i = 0 To 7
		imagemap.Put(bpcs1.Get(i),bfiles.Get(i))
	Next
	For i = 0 To 7
		imagemap.Put(bpcs2.Get(i),bfiles.Get(8))
	Next
	For i = 0 To 7
		imagemap.Put(wpcs1.Get(i),wfiles.Get(i))
	Next
	For i = 0 To 7
		imagemap.Put(wpcs2.Get(i),wfiles.Get(8))
	Next
	imagemap.Put("EEE","empty.png")
	Log("images: " & imagemap)
End Sub
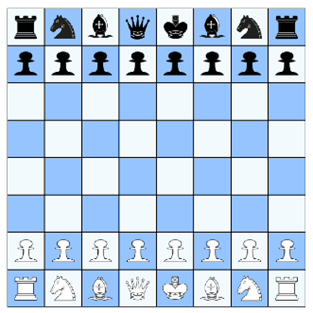
The subroutine that puts the images in the squares is as follows:
private Sub put_bitmap_in_cell(cellrow As Int, cellcol As Int, pnl As Panel,pce As String)
	cnvscell.Initialize(pnl)
	cnvscell.DrawRect(BorderRect, Colors.Black, False, 1dip)
	Dim bmp As Bitmap
	bmp.Initialize(File.DirAssets, imagemap.Get(pce))
	cnvscell.DrawBitmap(bmp, Null, DestRect)
End Sub
For this code to work we need to declare and initialize some variables.
In the Class_Globals routine add the following lines:
	Private cnvscell As Canvas
	Private imagemap As Map
	Private DestRect As Rect
	Private BorderRect As Rect
In the B4XPage_Created below the title or load layout line :
	imagemap.Initialize
	DestRect.Initialize(5dip, 5dip, 40dip - 5dip, 40dip - 5dip)
	BorderRect.Initialize(0dip,0dip,40dip,40dip)
	fill_imagemap
	setup_board
	show_board_log
	show_grid_log
We call the subroutine put_bitmap_in_cell in the routine setup_board below the grid(r,c) line:
put_bitmap_in_cell(r,c,pnl,board(r,c))
Before we can test the code we have so far we need to provide the image files.
You can download an image from the internet that contains all the piece images and then cut them out (a size of 80 pixels wide and high is good). Save each image and give it the name you find in the wfiles and bfiles array lists (see above).
Don't forget to make an image for the empty squares!
You can also find a zip-file with the image files here:
chess_pieces.
Add the files in the B4A IDE Files Manager panel.
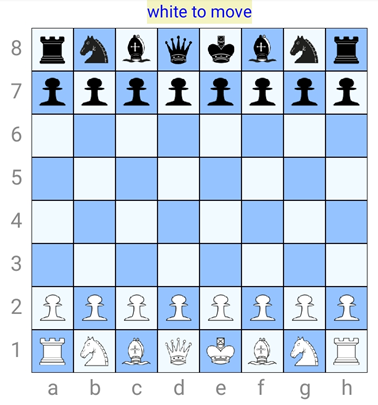
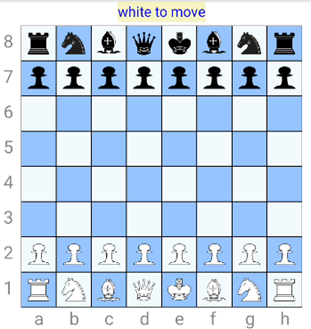
Now we are ready to test the code. This is the result:
You can draw the sides with this code:
Public Sub set_sides(cnv As Canvas, tfont As Typeface)
	cnv.DrawRect(TurnRect, Colors.ARGB(255,244,244,194), True, 1dip)
	cnv.DrawText(turncolor & " to move",140dip,20dip,tpfont,16,Colors.Blue,"LEFT")
	For r = 1 To 8
		Dim strnum As String = rnumbers.SubString2(r-1,r)
		cnv.DrawText(strnum,10dip,15dip+(r*40dip),tpfont,20,Colors.Gray,"LEFT")
		For c = 1 To 8
			If r = 8 Then
				Dim strlet As String = cletters.SubString2(c-1,c)
				cnv.DrawText(strlet,10dip+(c*40dip)-5dip,10dip+(9*40dip),tfont,20,Colors.Gray,"LEFT")
			End If
		Next
	Next
End Sub
Declarations for this code to work:
	Private TurnRect As Rect
	Private turncolor As String = "white"
	Private tpfont As Typeface
	Private cnvs As Canvas
Initializations:
	TurnRect.Initialize(140dip, 3dip, 240dip, 26dip)
	tpfont = Typeface.DEFAULT
	cnvs.Initialize(pnlmain)
Call to the subroutine as the last line in the subroutine setup_board:
set_sides(cnvs,tpfont)
Now the chess board is complete.