Assignment
This tutorial uses a lot of B4X components.
Although it's a tutorial for B4A it's also an opportunity to learn more about using the B4X code in a B4J project.
The assignment therefore (should you accept it) is to make a B4J application that has the same functionalities as the B4A app.
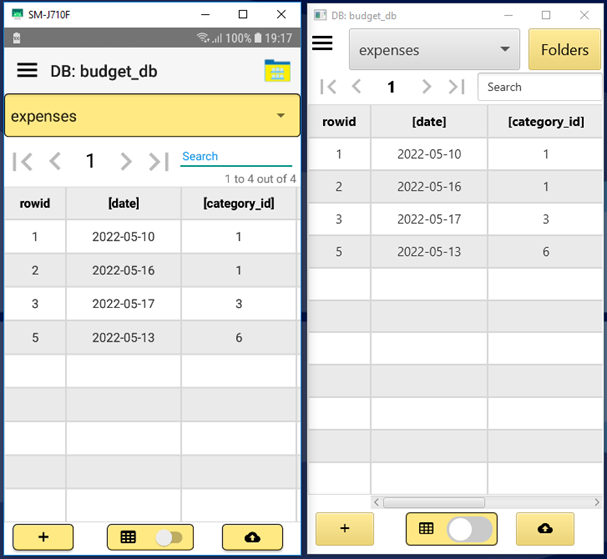
How does such an application look like?
On the left you see the B4A app and on the right you see the B4J application.
Here are some tips to make the transition to B4J as smoothly as possible.
The first thing you should do is to copy the B4A project folder and use that copy to work with.
In the project folder you will find 3 sub folders: B4A, B4i and B4J.
If you haven't done it yet, download and install the B4J IDE.
Go to the sub folder B4J in the project folder (COPY!) of the database manager app and double click on the file database_manager.b4j
Now you are ready to do some coding and copying.
- In the IDE add libraries for B4Xdrawer, B4Xtable, XUI views, jSQL (the B4J version of SQL).
- Add the database class module and copy the code from the B4A version.
- Add the FoldersPage B4XPage module and copy the code from the B4A version.
- Go to the designer (menu Designer / Open Internal Designer) and make the layouts as in the B4A version.
You can select all the components and copy them to the new layout.
- Some components are different in B4J. Read the booklet B4XPagesCrossPlatformProjects.
At page 20 you find a list of compatibilities.
- A panel becomes a pane, a switch becomes a B4XSwitch, an EditText becomes a TextField.
- In the database tab of the IDE remove the 3 lines in the action_query about the transaction. You don't really need them. Replace File.DirInternal with xui.DefaultFolder. This xui.DefaultFolder can also be used in the B4A version.
- Change the i variable to 1 in the find_record subroutine to avoid an error message about an ambiguous field e.g. TrackId
- In the FoldersPage tab of the IDE remove the line with the RuntimePermissions. Replace the initialization of the folders with this code:
Private Sub B4XPage_Disappear
	B4XPages.MainPage.fill_drawer
End Sub
This code refreshes the drawer list in case you removed a database file from the import folder.
- And now on to the changes in the B4XMainPage.
- Click on the B4XMainPage tab in the IDE. Go to the designer and load the layouts from the B4XMainPage one by one. Generate the members so that the variables are declared in the Class_Globals subroutine.
- Remove the RuntimePermissions line and the menuitem_add line and 2 menu subroutines.
- Change the folders lines as you did in the FoldersPage. (see above).
- The lines that contain the Colors type need to be changed. In B4J you can use colors with the XUI colors type:
xui.Color_ARGB(100,255,255,255)
or the predefined colors like
xui.Color_White
- Replace the code about the Hamburger menu (the first 4 lines in B4XPage_Appear) with this code:
Dim iv As ImageView
iv.Initialize("imgHamburger")
iv.SetImage(HamburgerIcon)
drawer.CenterPanel.AddView(iv, 2dip, 2dip, 32dip, 32dip)
iv.PickOnBounds = True
- Add 2 subroutines for the drawer (below the B4XPage_Appear subroutine):
Sub imgHamburger_MouseClicked (EventData As MouseEvent)
	drawer.LeftOpen = True
End Sub
Private Sub B4XPage_Resize (Width As Int, Height As Int)
	drawer.Resize(Width, Height)
End Sub
- Add or fill the subroutine for the button Folders:
Private Sub btnfolders_Click
	B4XPages.ShowPage("Folders")
End Sub
- The line about the ActionBar in the subroutine B4XPage_Disappear can be removed.
- The Activity_KeyPress subroutine is only needed in B4A. You can place compiler directives around it.
#if B4A
...
#end if
- In the fill_drawer subroutine you can use the AddTextItem method:
	'Dim pnl As Panel = drawer_item(lst.Get(i))
	'clv1.Add(pnl,lst.Get(i))
	clv1.AddTextItem(lst.Get(i),lst.Get(i))
- Add a subroutine for the B4XSwitch:
Private Sub B4XSwitch1_ValueChanged (Value As Boolean)
	If Value Then
		show_structure
	Else
		fill_B4XTable
	End If
End Sub
- if you add a label to the layouts from the dialogs then you only need to set the text of that label (Label1). The label has the right color. In the setup_dialog subroutine:
Label1.Text = lbltext ' in layout
- In the show_adddialog subroutine you can use a CustomListView. Change the layout accordingly and then change the code like this:
Dim pnl As B4XView = xui.CreatePanel("")
pnl.SetLayoutAnimated(0, 0, 0, 340dip, 270dip)
pnl.LoadLayout("adddialog_layout")
Label1.Text = "Add record to " & tablename
Dim lst As List = db.get_fieldnames(tablename)
For i = 1 To lst.Size - 1
	Dim p As B4XView = xui.CreatePanel("p")
	p.SetLayoutAnimated(0,0dip,10dip,340dip,90dip)
	p.LoadLayout("clvadd_item_layout")
	lblhint.Text = lst.Get(i)
	lblhint.PrefHeight = 30dip
	TextField1.Text = ""
	TextField1.Tag = "txt_" & i
	TextField1.PrefHeight = 60dip
	clvadd.Add(p,"")
Next
- The show_photodialog subroutine doesn't show the image yet. The content of the BLOBs in the test databases can't be converted correctly.
This code will display an image (jpg or png) if the BLOB in the test database is changed:
		Dim InputStream1 As InputStream
		InputStream1.InitializeFromBytesArray(Buffer, 0, Buffer.Length)
		Dim bmp As Image
		bmp.Initialize2(InputStream1)
		InputStream1.Close
		ivphotodialog.SetImage(bmp)