Cursussen/Courses Codesnippets     Top 
B4A-budget - settings layout


1. settings_layout
Create a new module for the settings page and call it SettingsPage.
Click on the newly created SettingsPage tab in the IDE.
Now go to the designer and make a new file called settings_layout.
This is how the layout looks like:
The Panel1 has the following dimensions: width 270 height 340
The floating text fields have the following dimensions: width 130 height 50. Set the hint texts to Start date, End date, Currency and Starting balance.
Add the 2 calendar buttons. They have the following dimensions: width and height 50. They have a FontAwsome typeface Icon that looks like a calendar.
And finally add the button Save and the button Reset. Both have the following dimensions: width 80 height 50. The Save button has a green color and the Reset button has a blue color (Drawable property - StatelistDrawable - Enabled Drawable - Color)
Save the file.


2. B4X page and menu
Here you can do the same operations as for the category page. Do you remember how to? If you don't then take a look at the category section.
A short summary: go to the B4XMainPage tab, add a declaration for the page, initialize the page and add it to the B4XPages, add a menu item.
These are the statements:
Private setpage As SettingsPage
setpage.Initialize
B4XPages.AddPage("Settings",setpage)
menuitem_add(Me, "Settings")
Go to the SettingsPage tab in the IDE, add the layout and give the page a title.
Root.LoadLayout("settings_layout")
B4XPages.SetTitle(Me,"Mybudget - settings")
While you are in the SettingsPage tab you can go to the designer and generate the members if you haven't done that yet.
	Private btnend As Button
	Private btnreset As Button
	Private btnsave As Button
	Private btnstart As Button
	Private ftfcurrency As B4XFloatTextField
	Private ftfend As B4XFloatTextField
	Private ftfstart As B4XFloatTextField
	Private ftfstartbalance As B4XFloatTextField
	Private Panel1 As Panel

Sub btnstart_Click
End Sub

Sub btnsave_Click
End Sub

Sub btnreset_Click
End Sub

Sub btnend_Click
End Sub


3. fields defaults
We are going to use public variables from the B4XMainPage. So let's first declare them in the B4XMainPage Class_Globals subroutine:
	Public strstartticks As String
	Public strendticks As String
	Public currticks As Long = DateTime.Now
	Public currmonth As Int = DateTime.GetMonth(currticks)
	Public curryear As Int = DateTime.GetYear(currticks)
	Public currday As Int = DateTime.GetDayOfMonth(currticks)
	Public lblbalance As Label
	Public strcurrency As String
Then in the SettingsPage tab go to the btnreset_click subroutine and add the lines to give the fields a default value.
Use the public variables like so:
	B4XPages.MainPage.strstartticks = DateUtils.SetDate(B4XPages.MainPage.curryear,B4XPages.MainPage.currmonth,1)
	Private numdays As Int = DateUtils.NumberOfDaysInMonth(B4XPages.MainPage.currmonth,B4XPages.MainPage.curryear)
	B4XPages.MainPage.strendticks = DateUtils.SetDate(B4XPages.MainPage.curryear,B4XPages.MainPage.currmonth,numdays)
	ftfstart.Text = DateTime.Date(B4XPages.MainPage.strstartticks)
	ftfend.Text = DateTime.Date(B4XPages.MainPage.strendticks)
	ftfstartbalance.Text = 0
	ftfcurrency.Text = "EUR"
	B4XPages.MainPage.lblbalance.Text = 0
	B4XPages.MainPage.strcurrency = "EUR"
You can do an intermediate run to see if this code is working.
Make sure you add the DateUtils library to the project.
Change the date format to 'yyyy-MM-dd' in the B4XPage_created subroutine from the SettingsPage.
	DateTime.DateFormat = "yyyy-MM-dd"
This is how the settings page should look like after you pressed the reset button:


4. calendar dialog
Now let's make the calendar buttons work.
In a previous tutorial you can find information on how to make a calendar library.
Link: B4A-calendar Fine tuning section.
In this project we are going to use a modified version of that calendar library.
So let's assemble the new library and call it calendar_dialog.
Make a new standard project with that name (File / New / Default). Open in a separate IDE the calendar_library project.
Add a new standard class module in the calendar_dialog project and give it the name calendar. The tab should appear in the project.
Now copy the code from the calendar tab in the calendar_library project to the tab calendar in the calendar_dialog project and replace what is already there.
In the calendar_dialog project we remove and add some code lines. Also make sure that the DateUtils library is checked.
In the set_month_panel subroutine remove the lines about the pnlsize and the screen adjustments and remove the pnlsize argument from the method.
set_month_panel(mnth As Int, yr As Int) As Panel
Set the variables boxwidth and boxheight to 40dip. In the dialog the calendar has a fixed width and height.
	Private boxwidth As Int = 40dip
	Private boxheight As Int = 40dip
Then add the subroutines to provide a new method called set_date_picker (see below).
This set_date_picker method contains the code to create a panel, a previous button, a selected date label, a next button and a month panel. The resulting panel can be used in a custom dialog as you will see in the next section.
The callback events subroutines take care of the button click events.
Declare the variables that are used in these methods:
	Private pnlpicker As Panel
	Public lblseldate As Label
O.K. Now you are ready to compile this calendar_dialog into a library. Select in the IDE menu Project / Compile to Library.
Public Sub set_date_picker(intmonth As Int, intyear As Int) As Panel
	pnlpicker.Initialize("pnlpicker")
	pnlpicker.RemoveAllViews
	Private btnprev As Button = set_button("PREV",Colors.ARGB(100,182,221,249),"btnprev")
	pnlpicker.AddView(btnprev,0dip,0dip,70dip,40dip)
	lblseldate = set_label("",Colors.ARGB(100,230,230,230),"")
	pnlpicker.AddView(lblseldate,70dip,0dip,148dip,40dip)
	Private btnnext As Button = set_button("NEXT",Colors.ARGB(100,182,221,249),"btnnext")
	pnlpicker.AddView(btnnext,218dip,0dip,70dip,40dip)
	Private pnlmonth As Panel
	pnlmonth.Initialize("pnlmonth")
	pnlmonth = set_month_panel(intmonth,intyear)
	pnlpicker.AddView(pnlmonth,0dip,40dip,278dip,368dip)
	pnlpicker.SetLayoutAnimated(0dip, 0dip, 0dip, 278dip, 368dip)
	Return pnlpicker
End Sub

Private Sub set_button(btntext As String, intbackground As Int, btntag As String) As Button
	Private btn As Button
	btn.Initialize(btntag)
	btn.Background = set_background(intbackground)
	btn.Typeface = Typeface.DEFAULT_BOLD
	btn.TextSize = 16
	btn.Text = btntext
	btn.Gravity = Bit.Or(Gravity.CENTER_HORIZONTAL,Gravity.CENTER_VERTICAL)
	Return btn
End Sub

Sub btnprev_Click
	If xui.SubExists(mCallback,mEventname & "_btnprevclick",2) Then
		CallSubDelayed(mCallback,mEventname & "_btnprevclick")
	End If
End Sub

Sub btnnext_Click
	If xui.SubExists(mCallback,mEventname & "_btnnextclick",2) Then
		CallSubDelayed(mCallback,mEventname & "_btnnextclick")
	End If
End Sub


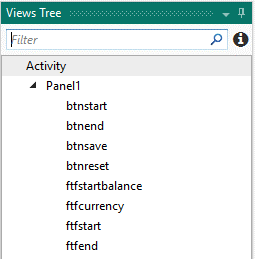
5. access the dialog
Lets clean up our working environment. Close all the IDE's except the budget_tutorial project.
Add the newly compiled library to the project. Remember the library files are saved in the AdditionalLibraries folder!
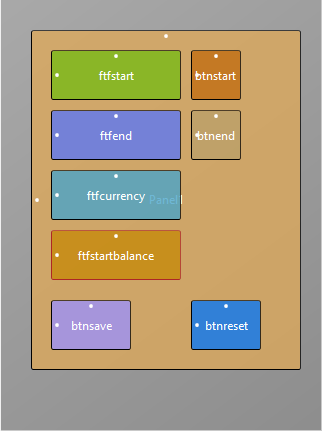
In the SettingsPage you can declare the variables needed:
	' calendar dialog
	Private cal As calendar
	Private pnl1 As Panel
	Private	currentticks As Long = DateTime.Now
	Public currentmonth As Int = DateTime.GetMonth(currentticks)
	Public currentyear As Int = DateTime.GetYear(currentticks)
	Public currentday As Int = DateTime.GetDayOfMonth(currentticks)
	Public lblseldate As Label
	Private caldialog As B4XDialog
	Private btnnext As Button
	Private btnprev As Button
	Public displayyear As Int
	Public displaymonth As Int
	Public setdate As String
 
And to initialize:

	' calendar dialog
	cal.Initialize(Me,"cal")
	caldialog.Initialize(Root)
	caldialog.PutAtTop = True
	caldialog.BackgroundColor = Colors.White
	lblseldate.Initialize("")
	pnl1.Initialize("")
	displayyear = currentyear
	displaymonth = currentmonth
 
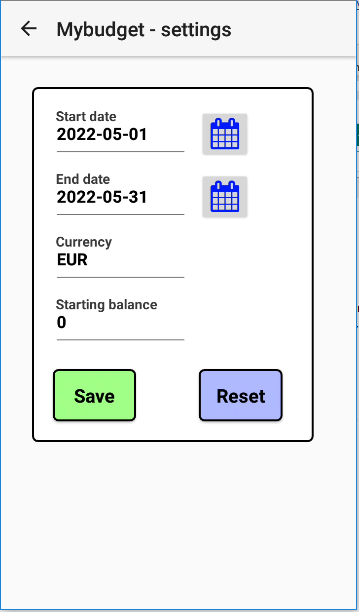
To use the library you can write some dialog code.
Make in the SettingsPage tab a subroutine called datepicker_dialog.
Initialize a panel to use in the custom dialog and set the text from the label lblseldate to empty.
	lblseldate.Text = ""
	pnl1.Color = Colors.White
	pnl1.SetLayoutAnimated(0dip, 0dip, 0dip, 278dip, 368dip)
 
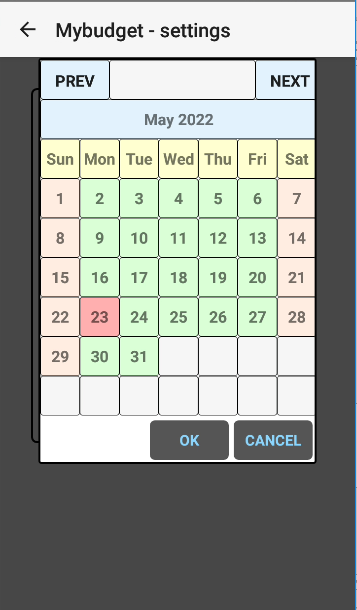
Then use the calendar object and its method set_date_picker to fill the panel.
The panel contains a label and 2 buttons above a month panel.
	pnl1 = cal.set_date_picker(displaymonth,displayyear)
	Dim rsub1 As ResumableSub =  caldialog.ShowCustom(pnl1, "OK", "", "CANCEL")
	Wait For (rsub1) Complete (Result As Int)
Now it's time to process the result of the dialog.
If the user presses the OK button from the dialog then we check the Result variable for a positive response.
The setdate variable is used to determine which date icon button was pressed in the settings layout.
	If Result = xui.dialogResponse_Positive Then
		If setdate = "startdate" Then
			ftfstart.Text = lblseldate.Text
			B4XPages.MainPage.strstartticks = cal.lblticks
		End If
		If setdate = "enddate" Then
			ftfend.Text = lblseldate.Text
			B4XPages.MainPage.strendticks = cal.lblticks
		End If
	End If
If the response is negative then the label will be set to empty.
The displayyear and displaymonth variables are used to load the previous or next month (see the code below).
	If Result = xui.dialogResponse_Negative Then
		lblseldate.Text = ""
	End If
	displayyear = currentyear
	displaymonth = currentmonth
To call the set_date_picker dialog in the btnstart_Click event use this code:
Sub btnstart_Click
	setdate = "startdate"
	datepicker_dialog
End Sub
To call the set_date_picker dialog in the btnend_Click event use this code:
Sub btnend_Click
	setdate = "enddate"
	datepicker_dialog
End Sub
The click (or tap) events from the calendar dialog are handled in the callback subroutines.
Public Sub cal_dayclick
	Dim dayticks As Long = cal.lblticks
	Log(dayticks)	' date ticks value
	DateTime.DateFormat = "yyyy-MM-dd"
	lblseldate.Text = DateTime.Date(dayticks)
End Sub

Sub cal_btnprevclick
	displaymonth = displaymonth - 1
	If displaymonth < 1 Then
		displaymonth = 12
		displayyear = displayyear - 1
	End If
	datepicker_dialog
End Sub

Sub cal_btnnextclick
	displaymonth = displaymonth + 1
	If displaymonth > 12 Then
		displaymonth = 1
		displayyear = displayyear + 1
	End If
	datepicker_dialog
End Sub


6. compile and run
Now it's time to run the app.
Press the date icon buttons and select a date, change the month, press the OK button or press the Cancel button.
Are the start date and end date filled or not filled with the selected date?
This is how the date dialog looks like: