3. Day number labels
The positioning is important. Lets improve that a little.
Declare variables for the positions (first lines of code in the show_month subroutine:
Private leftpos As Int = 0dip
Private toppos As Int = 0dip
Private boxwidth As Int = 50dip
Private boxheight As Int = 50dip
And then change the AddView line:
pnl1.AddView(lbldayname,leftpos+boxwidth*(i-1),toppos+boxheight,boxwidth,boxheight)
The loop variable i is used to calculate the left position. The first time (i-1) = 0 and 0 dips are added. The second time (i-1) = 1 the boxwidth dips are added. The third time (i-1) = 2 the boxwidth dips are multiplied by 2 and then added. And so on.
We add the boxheight from the month/year label to the top position to display the day names row.
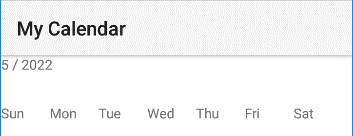
Did you change the line for the AddView of the month/year label?
It should look like this:
pnl1.AddView(lblmonth,leftpos,toppos,7*boxwidth,boxheight)
The total width of the lblmonth label spans 7 columns.
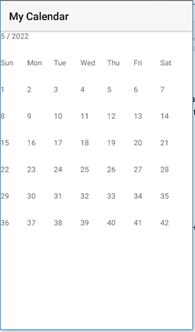
Now we add the 6 rows of 7 columns of day number labels. Declare a day number integer at the beginning of the show_month subroutine and initialize it at 1:
Private daynumber As Int = 1
We use 2 for loops to do this:
For r = 1 To 6
	For c = 1 To 7
		Private lbl As Label
		lbl.Initialize("")
		lbl.Text = daynumber
		pnl1.AddView(lbl, leftpos+boxwidth*(c-1), toppos + (boxheight*2) + boxheight*(r-1), boxwidth, boxheight)
		daynumber = daynumber + 1
	Next
Next
First we make a label object and set the text property to the day number. Then we add the label object to the panel. And then we add 1 to the day number for the next label.
The left position is calculated with the column variable c and the top position is calculated with the row variable r. The first 2 rows from the calendar take up space to so we add the boxheight * 2 to the top position.
The app now looks like this: